Showing posts with label Decor on a Budget. Show all posts

Friday, July 25

20 Bathroom Makeovers On A Budget | Hometalk

I'm curating a board on 20 Beautiful Bathroom Makeovers On A Budget over at Hometalk today! There is a bit of advice and inspiration for knock-off style, as well as some incredible blogger powered bathroom makeovers! Click here to see more over at Hometalk. 

I have completed 2 out of 3 bathroom makeovers in my own home on a slim budget, and let me tell you...it is possible! With a little inspiration, a little creativity, and a lot of elbow grease you can have the bathroom of your dreams. 

Tuesday, June 10

Who Needs Art In a Laundry Room? Me!

"Oh for the love of mercy, I'm the daughter of an artist!"... yep, that was my retort to my husbands quizzical eye-brow arch at my desperate search for wall art for a laundry room. I could read the question in his eyes, why did I have need for art in a room I barely spend time with my head up in? 
Seriously? It's art, it's pretty, it makes me happy, I want it absolutely everywhere, oh and I'm the daughter of an artist so what do you expect. *grin* But there are more reasons to display art in unexpected locations; remember that it completes the feel of any space, as if the room were dressed. So don't be afraid to add that finishing touch (the yummy icing on the cake) to any space!


Prints for Less
I was busy bemoaning my poor luck at finding laundry related prints when a thought hit me... Now, I confess this thought should have hit me years ago (I had quite the "uh duhh" moment), but I suddenly realized that if I just searched for a photography book I might actually have prints to put in the myriads of gorgeous empty frames I'd been collecting over the years, and not just for my laundry room but the entire house! 


I promptly planned a trip to my local library's monthly book sale, and imagine my glee and sheer joy to find two fantastic photography books for 25 cents a piece! Well, I didn't find laundry related art, but for a quarter I think I'll get over it. 


Finally the stars were aligned...or something. That same week I was looking through Burlington's home goods department when I spied these silver frames at $3 a piece!! It was a 70% markdown! At $3 a piece I couldn't very well leave them behind, they were just begging for a home.


My trick to fit the smaller pictures from my newly acquired photography book into a medium or large sized frame? Double matte! I'm using inexpensive smaller sized mattes under the mattes that came with the frame so they will "fit in" nicely. 


I love the bit of silvery sparkle these frames will bring to my laundry room. They will go perfectly with the brushed chrome pulls I've purchased for my cabinets!


At just the right time of day, when the sun is pouring through the back laundry room door, the light bounces off the frames and all over this room casting the prettiest reflections! 


Wednesday, May 7

Pintastic Pinboards & Painted Pins


By now you realize that I'm a bit pin board crazy. You have to understand, in a home full of little artists you need plenty of spaces to display artwork, inspiration, and other items. 
So when I found this ugly picture of a cherub in a beautiful frame at Goodwill for a buck, I had the perfect project in mind for it!


I removed the glass, put a layer of cork, batting, and cream colored fabric before placing the backing on, then tucked this completed little gem into my living room bookcase.

This is the perfect place to pin my favorite decorating inspiration. Yes, I am a huge Pinterest fanatic, but I still love to clip certain choice images from magazines and pin them to a board I can touch! I often include my own sketches, plans, fabric swatches, and paint chips for the space I'm making over.  

Of course, I couldn't just use any old pins on such a beautifully elegant pinboard. You know me, I'm way too cheap to buy cute pins while I have a large collection of perfectly functional ones at home. That being said, I was feeling a little resentful toward my old ugly functional pins!

I love the simple small changes that make a big difference. Using a little piece of felt, I took my existing pins, and gave them a little makeover!

Spray paint the tops, avoiding your fingers...because apparently I am am a bit of a spray paint klutz and it is harder than it sounds. *grin*

And presto chango! A few bucks in your pocket, and your old pins get a new outfit to try on. *wink* They are definitely ready for their debut...which no one will really notice, but you'll know it made a difference. 


Click here to see my painted jars tutorial.
Linky Love

Looking to make this? Use your existing frame & pins, and purchase these supplies:

Friday, April 25

Piano Lamp Turn Bookcase Lamp

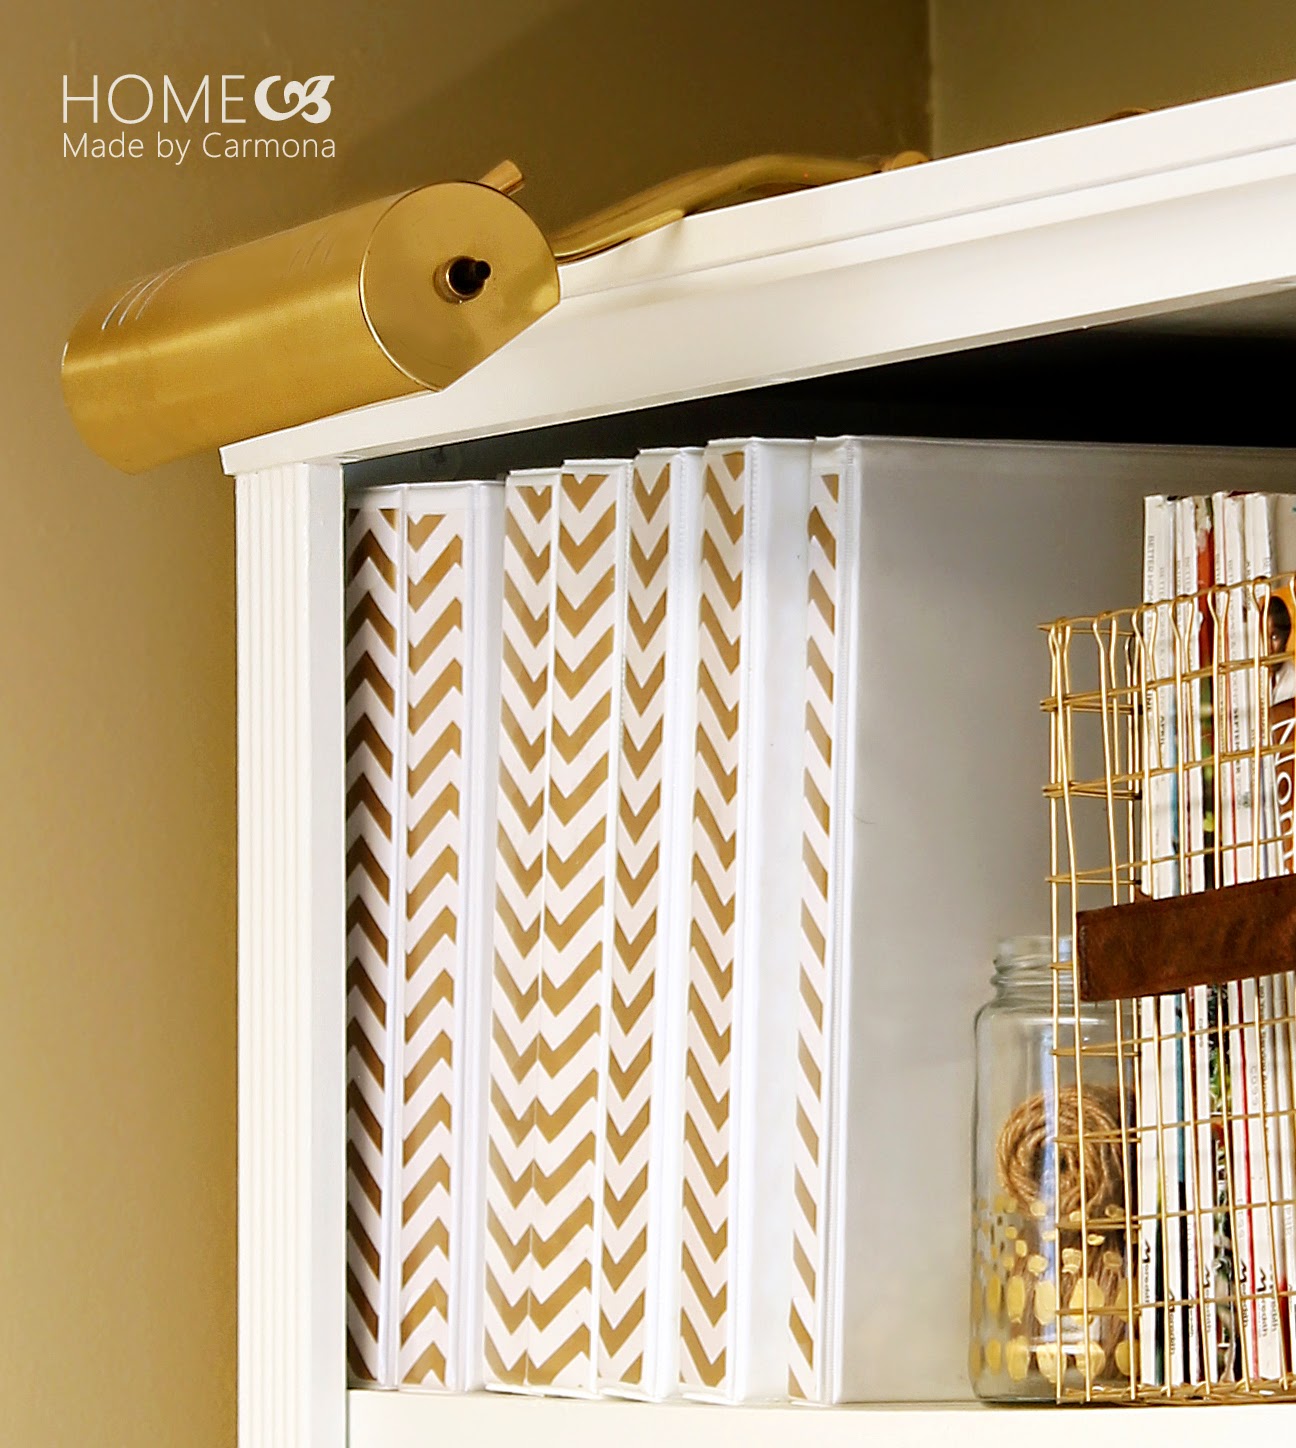
Looking at my living room bookcases, I just kept feeling there was something missing. Then one day I realized what was needed...a bookcase lamp. That's what is missing, and not just because it finishes the look of a tall bookcase, but because lighting is function as well as fashion.


Have you seen those bookcase and art lamps? They are thin and sleek, and perfect in every way...except price. The lowest price I could find in the style I was looking for $120 each, definitely not in my itty bitty budget. 
My solution? Turn piano lamps into bookcase lamps. They have a similar style, although not as slim as the ones I had my eyes on. The best part is that I already owned one of these lamps (a hand-me-down from my mother-in-law), and I managed to purchase an identical one via a Facebook garage sale for $15! 


So why not just sit the piano lamp atop my bookcase you ask? Well, for one it sits way too high and looks unnatural, for another the cord isn't even a fraction of the length necessary reach the top of a bookcase. With just a couple small adjustments these piano lamps will look like they were always meant to be bookcase lamps.

First I began by removing the fabric base at the bottom and loosening up the middle portion.


Next remove the wire nuts and untie the cord. Detach wire nuts by cutting wires or uncrimping. These are crimp connectors as oppose to the twist-on wire nuts, so you will need a pair of pliers to open them. Next unscrew nut to remove the heavy lamp base completely.


Set aside the crimp connectors, you will need them later. 


It should look like this once you remove all the extra parts of the lamp.


Unless your cord happens to be very long, you may will need to purchase an extension for your lamp cord. Also nice (but not necessary) is adding a cord switch somewhere along your extension. I won't be showing you how to do that since there are directions on the cord switch and it is a separate task. 


Now you will need to connect your extension wire. But before you do, thread the wire through the round middle portion of the lamp you removed...later this will house the connection between the old wire and extension wire. 


Strip wire, and connect  the old and new cord using the crimp connectors you set aside. 
Note: If your original cord was long enough simply reattach this cord in place of the extension cord.


Next stuff your crimp connectors into this round lamp midsection. Also wind and store any excess cord in here.


This is what it should look like when you are done. It is ready for use!


I attach this lamp to my bookcase by using screw-in hooks on either side. Then I can simply snap this lamp into place, and if ever necessary, I can simply slide it out to remove it. 


These lamps lend a little extra light to our dim living room, and also cast a gorgeous decorative  down light on my newly styled bookcases! 


I love that lighting is both functional and decorative! 


Friday, March 14

DIY Wire Baskets

I have wanted wire baskets forever! Ever since seeing them in a lovely Pottery Barn catalog. But $20-$30 for a single large basket? Uhhh, yeah right, even if my husband said "honey I want to buy you something special" I'd have to say no... are you kidding, do you know how many beautiful things I could stretch that $30 into? Or the $60 it takes to own three or four! So you can't imagine how thrilled I was to discover that you can make your own DIY wire baskets! 


I know many of you have been waiting for this tutorial, ever since I featured my first set of baskets in the upstairs hall storage post here. Then I made gold basket  above which I featured in my bookcase makeover here. So finally I'm sharing the how-to!


This tutorial is best shown, so watch my video on a simple method for making your own basket, then below you will find technique tips, and instructions to make a faux leather handle. Happy viewing!


TECHNIQUE TIPS
I first saw DIY wire baskets via Turnstyle Vogue and began making my own version. It took a while for me to share because I wanted to perfect the technique. This method reduces the number of raw edges that will be exposed. Just to help you get it right the first time, here are a few tips to aid along the way:

  • Sharp Wire Cutters: Always use sharp shears, it keeps cut wire from being too jagged or frayed. 
  • Unfurl Wire Roll: Before cutting your pieces out, lay the roll face down and carefully straighten it out as much as possible. This will make cutting an easier process. 
  • Keep All Cuts Flush: Cut as close to the edge of spine of the criss -crossed wire as possible. This ensures no sharp wires will protrude out of your basket. 
  • Bend on the Spine: Every time you bend the wire, do so at a spine and not in between two rows. Always make your bend as square as possible as opposed to curved. This lends to a professional finish. 
  • Reinforced Top Tip: When doubling over what will be the top of your basket, be sure to bend on the spine, and make the squares line up.
  • Weaving Tip: Don't think of this quite the same as sewing. Rather than pulling your wire through by the top (as you would thread), gently guide the wire (and any kinks or loops) through by the top, then middle portion. Once you have brought the wire through the square pull taut by the base of the wire (not top).
  • Take Your Time: Once you get the hang of it you can breeze through making baskets in 20 minutes, but how precise you are determines how good your basket looks! 
  • Spray Paint: Customize your baskets with a coat of your favorite color spray paint, and finish with a coat of clear protective spray paint. 

DIY LEATHER HANDLE
You could cut out handles, you could attach a wire handle, or a rope handle. You are only limited by your imagination. Personally I love the look of a leather handle on baskets and bins, and to make my own required a bit of faux leather fabric and 5 minutes!
Follow the pictured instructions:


I hope you love your baskets as much as I love mine!

Linky Love

Sunday, December 8

The Two-Day Powder Room

We like to believe that it is our biggest rooms that have the greatest impact when it comes to decorating, but I find that it's the small spaces that I love to makeover the most. First off, who says a small space can't have a big impact? And then there is the benefit of completing a small makeover in a day or two and feeling that sense of accomplishment with a fraction of the money in a fraction of the time. 


Powder Room Before
Let me start by saying that there was nothing terribly wrong with the function of this bathroom. It functioned just fine, and I suppose some people would have liked the wallpaper. However one of my little girls took it upon herself to be "helpful" and prematurely peeled the curling wallpaper border along the base. *sigh*...kids. I suppose that means it's time for a makeover, and guess what little person has to do most of the low wallpaper peeling? Do the crime, do the time! 


Wallpaper removal took a grand total of 2 hours using some simple steps you can read about here. 


Lately I've noticed I seem to have gained an obsession with dark walls...I've probably pinned a hundred incredible photos of gorgeous charcoal and navy colored rooms! Mmmmmm, a nice dark navy with big bold pieces of gold leaf art.... *drool*  Well I decided to indulge that obsession, just a little bit. *grin* It's a small space, so it can't hurt! You can imagine how thrilled I was to find a deep blue Glidden paint color in the oops/discount section at Walmart for $12... yes, that is 50% off the regular price! Cha-ching!!

Of course, those big blue walls just don't do justice without being complimented by some art to make them both pop. I found deeply discounted frames at Joann's Fabric Store and spray painted them with Krylon metallic gold paint.


These lovely prints I found free online at vintageprintable.com . For the elephant print go here, for the giraffe print go here. 
Accessories
Target is my kryptonite. You should have seen me with my little $10 Mypoints Target gift card, flying around the store in a blissful tizzy, my 3 kids in tow. I kept putting items in the cart, then running them back when I found something I wanted more! *giggle* 
I finally settled on this marble salt bowl priced at $3.98 marked down from the original $7.99. Forget the kitchen, this would be my ideal soap dish!


I also found this awesome metallic soap dispenser at Target for $12.99, but it rang up for $9.99, and when I told the cashier, she just shrugged and said "that's what it rang up for". Be still my frugal heart! *beaming* After using my $10 gift card, I only had to pay for the marble dish and the rug!


While working on the upstairs bathroom I painted some decorative bowls a gorgeous metallic gold, and while my trigger finger was gold paint poised, I painted one extra little Goodwill bowl just for good measure (or because I'm now obsessed with this gold paint...you choose).


I had such a great time making DIY Lulu & Georgia inspired rugs for both of my bathrooms, but I particularly love this Dot rug. Thanks again to Target's kitchen section (ha! there is more kitchen in my bathroom than bath goods!), I was able to find a plain mat for $7.19... that makes this DIY rug an inexpensive winner at $9!  


Powder Room Budget Breakdown: 
Keep in mind that I just made-over my girls Jack & Jill bathroom on $83, so this bathroom needed to be...well, cheap. Here are all the details on how I refreshed this little 1/2 bathroom on a total of $36!


  • Bath Rug - $9: Target rug, $7.19 (after 10% reduction for damage). Folkart acryllic paint from Walmart $1.77.
  • Wall Art - $10: 2 frames from Joann Fabric Store (60% sale off + 25% off coupon) @ $4.89 each. Prints $0 (prints found online, Staples enlargement 49 cents each before staples rewards).
  • Accessories - $5: 1 soap dispenser from Target $0 ($9.99 before using a $10 Mypoints gift card to Target). 1 marble salt dish from Target (marked down) $3.98 ...(minus a 5% discount). 2 bowls/dishwear from Goodwill 50 cents each.
  • Wall Paint - $12: From the "Oops" discounted section at Walmart (was 50%)
  • Miscellaneous Project Materials - $0: Already owned. Includes painting tools, and spray paints.